General Cache Information
Sometimes problems that should not occur on your site are simply due to your own cache, and can be quickly resolved by clearing the cache. There are three types of caches that can affect the performance of your website. These caches are browser cache, plugin cache, and server cache. Please read below to learn how to clear each type of cache.
- Browser Cache – this is a cache stored by your browser to allow your page content to load faster.
- Plugin Cache – this is a cache specifically from a 3rd party WordPress plugin.
- Server Cache – this is a cache imposed by your hosting company directly from your server.
How To Clear Browser Cache For Any Browser
Your browser cache, also known as Temporary Internet Files in some browsers, is a folder where some items, such as images, photos, or even entire websites, are stored or cached. This is done so that frequently visited websites take less time and load much faster. There are times when simply refreshing the page is not enough and you need to clear your browser’s cache to solve some problems.
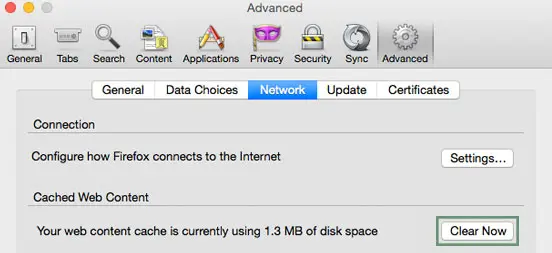
For Mozilla Firefox
Step 1 – Click the Open Menu icon located in the upper right corner of the browser. The icon will look similar to three stacked bars.
Step 2 – Click the Preferences option, and switch to the Advanced tab.
Step 3 – Once you are on the Advanced tab, switch to the Network tab.
Step 4 – In the Cached Web Content section, click the Clear Now button to clear your browser cache.
For Google Chrome
Step 1 – Click the Customize icon located in the upper right corner of the browser. The icon will look like three stacked bars.
Step 2 – Click on the Settings option, and switch to the History tab on the left side.
Step 3 – Click the Clear Browser Data button.
Step 4 – Select The Beginning of Time from the drop-down menu, making sure that only the Cached Images and Files option is selected.
Step 5 – Click the Clear Browsing Data button to clear your cache.

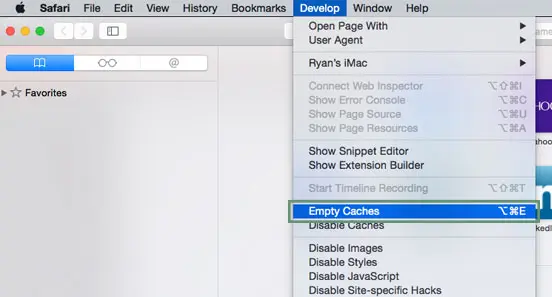
For Apple Safari
Step 1 – Click the Safari option on the menu bar at the top of the screen.
Step 2 – Click the Preferences option and the Preferences window will appear.
Step 3 – In the Preferences window, go to the Advanced tab. Once there, make sure that Show Developer Menu in Menu Bar is checked.
Step 4 – In the top menu bar of the Apple Safari browser, you will now see a Developer option.
Step 5 – Click the Developer option, and then select the Empty Caches option to clear your cache.
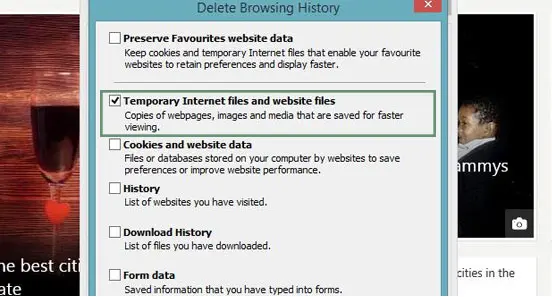
For Internet Explorer
Step 1 – Click the Tools icon in the upper right corner of the browser. The icon will look like a cogwheel.
Step 2 – Click Internet Options from the drop-down menu. The Internet Options window appears.
Step 3 – On the General tab, under the Browsing History section, click the Delete button.
Step 4 – Make sure the Temporary Internet Files and Web Site Files option is enabled.
Step 5 – Click the Delete button to clear your cache.
How to Clear a Plugin Cache
If you’ve installed a 3rd party cache plugin, such as W3TC, or WP Super Cache, it may also interfere with the way your site works and cause unexpected problems. To clear your plugin cache, please read on below.
For W3TC
Step 1 – In the top menu bar of your WordPress Panel, you will find a Performance tab.
Step 2 – Under the Performance tab, click the Clear Cache option to completely clear your W3TC plugin cache.

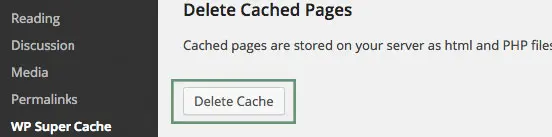
For WP Super Cache
Step 1 – In the Settings tab of your WordPress Panel, look for the WP Super Cache option.
Step 2 – In the WP Super Cache tab, click the Delete Cache button under the Delete Cached Pages section to clear your plugin cache.
How To Clear the Server Cache
In some cases, we use server caching software installed which may also be the cause of issues on your website. You will also need to remove this to resolve these issues and to preview any new changes you make to your website.
Please contact us from Support page.